Squarespace Latest Update On Retiring Fonts And What That Means For You
In recent news, Squarespace announced that they were retiring certain fonts from its collection. This means font favourites like Neue Haas Grotesk Display, Calibri, and several families from Franklin Gothic are now unavailable to use on new places on your website. If you’re thinking of trying to get around the retired fonts by simply duplicating your site, that won’t be an option either.
To check if you’re currently, view the full list of retired fonts on this Squarespace article.
So what does this mean for you?
You have three options if you’re currently using a retired font:
Change to a different font
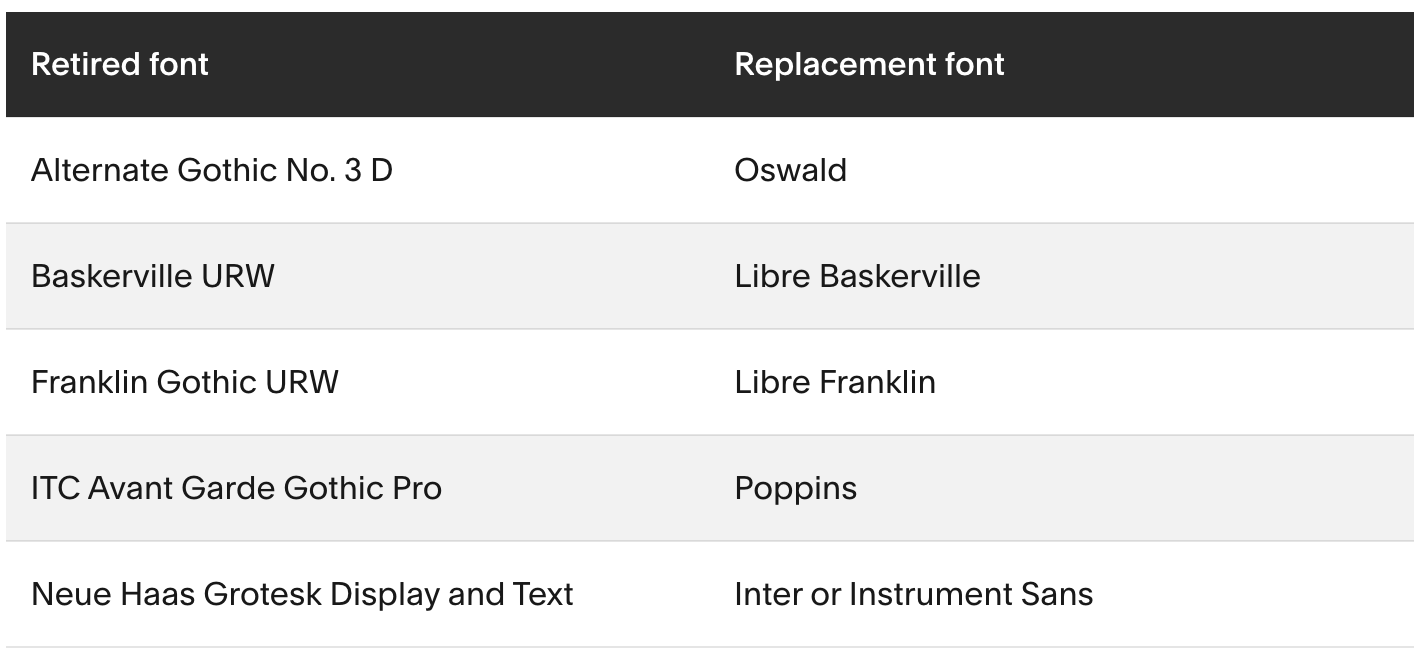
If you’re currently using a retired font, you can change your font for a similar font available on Squarespace. This may mean you need to update your branding and marketing materials to match if you’re concerned about consistency.
Squarespace has provided us with replacement options that give a similar feel to the original font. Here’s some examples.
To change your font on Squarespace, follow these steps once logged in:
Visit Site Styles.
Click on Fonts.
Click on Headings, Paragraph, Buttons, Miscellaneous, or Assign Styles.
Click Fonts, then search from the drop-down list for a new font.
Upload a font
Alternatively you can purchase and download a font and upload to Squarespace using CSS code. To upload a font, follow these steps once logged in:
Click Pages, then Website Tools, then Custom CSS.
Click Custom Files, and upload your font file.
Then add the following code to the CSS, then replace the URL by adding the URL from the custom file and font name. The code below changes the font for headings.
 @font-face {
font-family: FONT-NAME;
src: url(FILE URL GOES HERE);
}

h1,h2, h3,h4 {
font-family: "FONT-NAME", sans-serif;
}
Use Adobe Fonts
If your font is on Adobe Fonts, then creating an Adobe Creative Cloud account could be a good solution. To this, you will need:
Visit Adobe Fonts and find the font you want.
Click on </> icon. It will prompt you to add to a project. Create a project for your website.
Copy the code that is generated. The you’ll need to put it in your site's header. You can find this by going to Website, then Website Tools, then Code Injection.
Then copy the CSS code font Adobe Fonts and add it to your custom CSS. To find custom CSS, click Pages, then Website Tools, then Custom CSS. You may need to tweak the CSS to get it working across different headings and paragraph text.
If you need help with fonts, get in contact and we’ll be able to help!